

Activity 19 - Excel
Make sure you change your cell format to currency where needed. Also, to insert a header, click the insert tab, header & footer, and enter the information asked for in the activity.
Make sure you print it out in landscape and click to fit on one page before you print.
October 31st - Happy Halloween


Read User's Comments0

October 27th & 28th
Finish and print activity 8 if needed.
Activity 9 & 10 - print and turn in.
Blogpost
- 9th graders talk about your tour yesterday and what classes you are interested in signing up for next year. Use pictures!
-10th-12th grade - list the careers you learned about yesterday and which one you are the most interested in pursuing after graduation. Use pictures!
Activity 11 in Excel - please note that this uses Activity 10. You will pull it up and add to it so you must have 10 finished before you begin 11. Also, please don't type the whole activity again if you have 10 saved.
October 25th & 26th
Microtype - 15 minutes
Finish and print activity 8
Make sure that you have completed and received credit for all Excel activities up to this point.
Activity 9 & 10 - print and turn in. Make sure you have saved to your user number.
October 20th & 21st
Microtype - 15 minutes
Excel Activity 6 - After typing, make sure you follow the formatting steps (3-10) on the first page. This activity reviews all that we learned on Tuesday and adds one new skill which is the "fill" feature. I will show you how to do this after we get started.
Excel Activity 7 - This activity gets you to format some cells as numbers. To format cells, you select them, right click, pick format cells. Then you will click numbers and pick the correct number of decimal places.
If you are in Mrs. Starnes' class, remember that you will show me your work on your screen when you are finished for your points.

October 18-19
Today we will be starting Microsoft Excel. Excel is an electronic spreadsheet. It helps you record data and information. Most students find Excel easier to use because you can use your numeric keypad on your keyboard and it typically doesn't require as much typing as Word.
Basic Excel Information:

- Cells are made up of rows and columns.
- Each individual square on the worksheet is considered a cell.
- Columns are vertical and are labeled by LETTERS.
- Rows are horizontal and are labeled by NUMBERS.
- Each cell has a cell address. For example the spreadsheet below shows two cells & their addresses.

TODAY'S ACTIVITIES
****Excel It Workbook- Activity #3****
To bold, underline, italicize, and center cells you use the same part of your ribbon as Word :
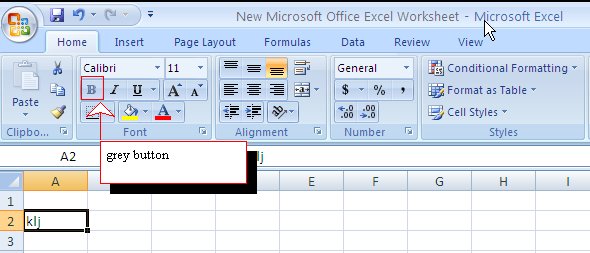
Bolding in Excel- Highlight the Cell & Click on the Bold Icon on your ribbon

Underlining in Excel- Highlight the Cell & Click on the Underline Icon on your ribbon

Italicize in Excel- Highlight the Cell & Click on the Italicize Icon on your ribbon
# 8 Tells you to Set & Save the Print Area
Use the picture below and these steps

1) Highlight the cells in your table containing ANY DATA!
2) Go to Page Layout
3) Click on Print Area Drop Down Box
3) Click on Set Print Area
4) You should now see a dotted line around the data
BEFORE PRINTING YOU ALSO NEED TO DO #9 (FIT SHEET ON ONE PAGE) & MAKE SURE THAT IT PRINTS YOUR GRIDLINES AND HEADINGS
1) To make sure your document prints gridlines and headings, on the PAGE LAYOUT TAB click on the two options. See below:

2) You also need to make sure your spreadsheet prints on one page- Go to PAGE LAYOUT TAB, Click on the arrow in the bottom right hand corner and then when the PAGE SETUP DIALOGUE BOX appears, clcik on the "Fit to 1 page wide by 1 tall" option.

Print Excel Activity #3 and turn in the tray.
****Excel Activity #4****
To format the width of a column: On your HOME TAB, click on FORMAT, then click on COLUMN WIDTH and enter the width you want your cell to be.
Don't forget to set your print area, print gridlines and headings, and set it up to fit to one page just like you did in activity #3.
****Excel Activity #5****
1) In #5 you are to select and format cells to text.
Highlight the cells you want to format as text.
Right click & click on FORMAT CELLS.
Then on the NUMBER TAB, select TEXT.
The default is set up for general as shown below, You must select TEXT!!!!

2) To sort information in Excel for #10:
Highlight cells B10-E29.
On the HOME TAB, click on SORT & FILTER, THEN CUSTOM SORT.

When the Sort Dialogue Appears, click the drop down box for SORT BY, and select column B, because you are sorting by last name.
October 14th
4th and 8th
Please put all books away, log on, and prepare for your exam. Make sure that you put a header on both documents. After both are printed, please staple together and turn in where designated. After you are finished, please find a quiet activity so that others are able to finish their tests in a quiet atmosphere.
2nd and 4th
If you are not taking the exam, please turn to Activity 47 in your Wordit book. You will type the newsletter on p. 113 following the formatting instructions on p. 111. Type the title and the line under the title. Then you are ready to insert columns so click page layout, more columns, pick two and change the apply to at the bottom to "this point forward. Also, click the box that adds a line in between the columns. Click insert, symbols to insert the squares within the newsletter.
When finished, save, print and turn in for points. You may check for any missed assignments, finish Microtype, or study for your next exam.

Subscribe to:
Posts (Atom)